You may have already seen my right angle weave video tutorial on my “sister site”, but now it’s time for another look at right angle weave. Because it doesn’t always look the same!

When you think of RAW (as it is also called) you probably think of a piece that looks like a grid of sorts. And you’re right — it does often look that way. It is usually a very regular beading stitch.
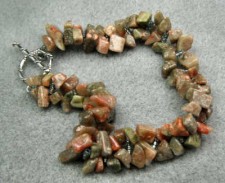
But what happens when you choose a different kind of bead to make your piece? What happens is what I call “Slink Stones”! And if you want to make your own, read on and you’ll get a video tutorial!
Get Slinky with RAW
This isn’t a typical look, and isn’t immediately obvious that it’s right angle weave. But once you see how it’s made, it’s definitely RAW.
The feeling of this particular piece is very, very slinky on the wrist — thus the name.
I made this bracelet with one of the toughest beads to use easily — gemstone bead chips. Sure, they are easy to use as a component, in (for example) a strung necklace. But it’s not all that often you’ll find a project that uses the chips as the main bead.
Before you get to the video, though, I do want to mention something — this bracelet is pretty heavy due to all the gemstone chips used. You will definitely want to use doubled thread and/or something like Fireline.
Slink Stones — Supplies and Video Tutorial
All that being said, it’s time for the list of supplies and then the video. Here you go:
- Gemstone chips, roughly a 16″ strand. You won’t use all 16″, but unless you have a 6 inch wrist, you’ll use more than half. In the video, I use a jasper — usually I hear it called either “autumn jasper” or “harvest jasper”.
- Seed beads — size 11, somewhere around 2 grams, give or take a little.
- Clasp. I use a sterling silver toggle clasp. A two-strand bar clasp would also work nicely or a lobster claw would be good.
- Thread — use something like Fireline or PowerPro. Use at least a 6-lb test — 8-lb is even better. This is a heavy bracelet! Although I don’t show it as doubled in the video, you might want to consider it. Don’t bother with something like Nymo — it will end up stretching and sagging.
- Needle — size 10 will work, or you can use a size 12 if you wish. You can use a sharp or the longer beading needle, whichever you prefer.
- Scissors or other cutter. I know a lot of people say don’t cut Fireline with your good scissors, but I’ve been doing it for at least two years now. Just don’t cut it with the tips.
Now that you know the supplies, here’s the video. It’s longer than my usual videos, so get yourself something to drink and plop yourself in your favorite chair. And if you enjoy the video, how about liking me on Facebook (thank you kindly). 🙂