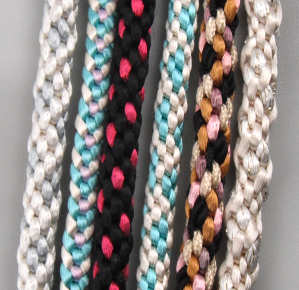
I’ve spent the last few weeks doing some kumihimo braiding, and I have been having fun. I dug out my two existing books, then got three more to boot. Not to mention a ton more silk and satin for braiding! And yes, I have even make a kumihimo video tutorial!
So Many Braids…
 I’ve been experimenting with a lot of materials, textures and cord sizes. All of the braids to the right are using the same braid pattern, except for the braid that is second to the left. Otherwise, the only differences are colors and cord sizes (and of course, the way I set up my colors on the foam disk).
I’ve been making these braids into necklaces as well; you see, I have a lot of pendants, especially of the beaded cabochon kind, and many of them really need a more substantial necklace to balance them out. I have found that kumihimo works up much faster than traditional beading stitches, so after completing a pendant, it’s a soothing cool-down to make the braid to go with it.
Time for the Kumihimo Video Tutorial
If you’re wanting to learn to make braids, here is a quick kumihimo video tutorial for you. The supplies you will need are as follows:
- 1 Kumihimo foam disk
- 4 pieces of satin cord; I am using size 1 rattail in 4 colors (one of each): Peach, Silver, Ice Pink and Ivory. Each cord is 60 inches long.
- 1 twist-tie (you can also substitute a piece of wire or a piece of string). I use this to tie my cords in the middle, and so my four 60-inch cords become eight 30 inch cords.
- 1 piece of string, about 1 foot long.
Now obviously you can use any colors you want; I just used 4 different colors so that you could see the progression around the disk. I tend to use 2 or three colors, but one of these days I am going to experiment with 5 or more colors to see what happens, LOL.
I’m showing you the most basic stitch, which is what I used on most of the braids in the photo at the top of this post. You can get all kinds of looks from it, though, just by varying the materials, colors and thicknesses.
Ready? Let’s learn kumihimo!
And of course, I got my cord at The Satin Cord.
Thank you, your video was very helpful. I should be able to start braiding.
Hi Deborah,
You’re very welcome, and I am glad that the video was helpful — I hope you enjoy making braids using kumihimo!
Gail
Gail, Loved your video. But I’d like to know what you did to get the ‘bumpy’ look on the last piece you demonstrated on. I like that look!
Hi Garnie,
Thanks for your kind words — I am glad you liked the video. The bumpy look is so easy — it’s just using different weghts of the satin cord! For example, I like the look of using the rattail (3mm in diameter of satin courd) with bugtail (a little over 1 mm), By making 2 of the strands a lot thinner in size, you get the textured effect.
Another great combination is using a rattail or moustail (2 mm) cord with Chinese knotting cord (less than 1 mm). Not only are the two kinds of cords a different texture themselves (Chinese knotting cord has a braided look and feel), they make a lovely kumihimo braid. 🙂
Gail
Hi Gail,
Hope everything is still going well for you. I have a blog now. Hope you get a chance to check it out. Yes, I am still doing Kumihimo. Are you on FB? Email me…
Hi,
I saw your video and decided to try. And I get it, I have a wonderfull necklace. My teenager daughter ask me to do a bracelet and that an evidence !!!!! that your video is great.
Jéroise from france
its lovely
i’m just starting out with this technique and your video made it so simple! i have a question on lengths, however. i would like to make a nine foot cord – how long of a beginning cord should i use??
thanks!
Hi Kristina,
Thanks for the question! I usually allow for three times the finished length of the braid. If you want one 9 feet long, each cord would need to be 27 – 30 feet.
Would love to see a photo of it when you have it done!!!
Gail